Getting started with Windows driver/rootkit development
In this article, we will go through everything needed to start developing a Windows driver or rootkit. As a first step into the world of Windows’ kernel development, we’ll start with a Windows Xp sp2 environment and a few very simple tools freely available. Here’s the minimum and/or suggested requirements for getting started:
- Windows Xp sp2 virtual machine
- Microsoft Visual Studio 2008 Express Edition
- Windows Driver Kit Version 7.1.0
- Driver Loader
- DebugView
You can now prepare your Windows Xp virtual machine, download the other tools and install them with default configuration. We’ll go through more detailled configuration later when needed.
First, we need to create a directory to store our drivers’ source code. For simplicity, let’s create « c:\mydrivers\helloworld\ ». You can choose an other name but be aware of spaces. Our « Hello World! » driver source code looks like this:
#include "ntddk.h"

VOID OnUnload( IN PDRIVER_OBJECT pDriverObject )
{
	DbgPrint("OnUnload called!");
}

NTSTATUS DriverEntry( IN PDRIVER_OBJECT pDriverObject, IN PUNICODE_STRING registryPath )
{
    DbgPrint("Driver loaded!");
	DbgPrint("Hello world!");
	pDriverObject->DriverUnload = OnUnload;
	return STATUS_SUCCESS;
}
Before we go through the build process, we’ll need at least 2 more files: « MAKEFILE » and « SOURCES ».
!INCLUDE $(NTMAKEENV)\makefile.def
TARGETNAME=HELLOWORLD
TARGETPATH=OBJ
TARGETTYPE=DRIVER
SOURCES=helloworld.c
When installing the Windows Driver Kit, called WDK, it installs a lot of tools and documentation for developing a driver. One of them is the « Checked Build environment » and it can be found in the « Start->Windows Driver Kits->…« . It simply opens a « CMD Shell », change your directory to the one that hold your driver source code and enter the command « build » at prompt. It will create a « .sys » file, here « helloworld.sys » containing the driver.
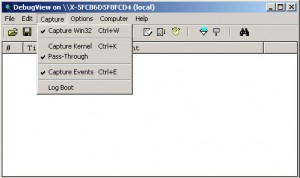
 Before going any further, we’ll look at a simple way to debug our driver. Let’s start DebugView and configure it properly. In the capture menu, select « Capture Kernel », close and restart the application. Now it will capture everytime you’ll use the function « DbgPrint » in your driver in the same manner as printf. Here you will notice that there is a not a lot of option when it’s time to debug kernel code. In this land of BSOD, Blue Screen of Death, I’ll suggest to use the screenshot capability of your virtualization solution.
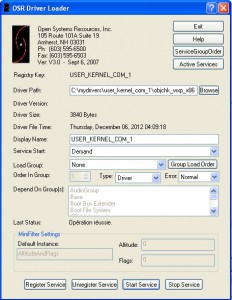
 A last step is to load our driver into the kernel. To achieve our goal, we’ll use the « OSR Driver Loader », a driver loader utility. A complete debug tutorial will be shown in a following post. Look at DebugView when you register your driver and then start it. You should see the famous « Hello World! » appearing like the Holy Grail! You will soon discover that it is all or nothing when messing with the kernel and begin appreciating those little victories when there’s something else than a BSOD.
What we’ve learn so far? Rootkit technology is very close to driver developement and debugging something that is badly documented will be challenging. At least we can figure out that the « DriverEntry » function will act as a « main » function and a function called « DbgPrint » that act in the same manner than « printf » will help to leave some trace to follow the code execution of our friver. Maybe it seems a quite confusing for the moment but a serie of posts about driver and rootkit development will bring light out of this.
Please don’t hesitate to take a look at the documentation that comes with the WDK and if you want to start with a very good book, I’ll suggest Rootkits: Subverting the Windows Kernel from Greg Hoglund and James Butler.


 (10 Ratings)